I started messing with some beads and wire and, though I thought I was going to make a nest ring, it turned into these instead. My friend told me they look like "whimsy".
Wednesday, December 14, 2011
Saturday, December 10, 2011
Our Chocolate Wasted Cake
My middle child is having a birthday and this year he wanted a chocolate cake. On Pinterest I came across this Chocolate Wasted Cake and I knew he would love it! (minus the alcohol, of course, as he's only 9). My pictures (below) do not do full justice to her cake and you should check out the original. Also, hers has a tasty twist if you are making it for adults only.
For the chocolate drizzle on mine I melted chocolate chips in a double boiler and used some Torani Almond (Orgeat) syrup to thin it enough for drizzling. If you do it the same way, be careful not to use to much drizzle, as the Almond syrup has a really strong flavor. I was thinking that using peanut butter could be really tasty, too, and would be a little more subtle.
Can't wait to try it!
Labels:
Birthdays,
Food,
Moments of Motherhood
Sunday, November 27, 2011
Tomato Cage Trees
I found an idea on Pinterest (originally from Lucy Designs) that I wanted to try out. But, since she doesn't have a tutorial, I thought I'd explain a few things about it that I was wondering as I went into this project.
What you need:
2 urns/pots
2 tomato cages (these were 56 inches from tip to end)
Garland (for my size of cage it took 6 of the 9 foot garlands, or 54 feet, for each tree)
Lights (I used two 100 light (24 foot) strings per tree)
The total height of my finished trees is 67 inches. As I was buying the tomato cages (yup, they do still have some at Home Depot) I checked the fit of the cages to the pots and it was perfect to sit in there as they were. They are not in any way secured to the pots and can lift right out. I love this because it means I can store the trees and use the pots throughout the year and when the plants die in the fall I can just set the trees over the top of the pot and into the rim.
Since I just bought these pots, the inside is still completely empty. If you live in a windier area I would suggest filling it with dirt or rocks. You could also stick a piece of pipe into the filler to tie the cage to so it wouldn't blow away. Luckily my entry way is protected so I didn't have to do this, despite the amount of wind we get here.
At the top I used a small piece of wire (twist ties would probably work as well) to secure the ends together.
Two people have come over so far and neither noticed it wasn't an actual tree till I told them, though it helps that the wreath is real so the front porch smells like trees. :) I may still put some ribbon on them, not sure, but for now I think they look really pretty.
I also really like the nighttime look of the cage and lights without garland, though I'm not sure how pretty it would be in the daytime. (See it here)
Labels:
Decorating - Holiday,
Holiday,
How To
Tuesday, November 22, 2011
Hemp Bracelet
A few months back I saw someone demonstrate a way to tie up extension cords that I thought was just genius (see the technique here). Then today I realized I could apply the same method to make a bracelet and it came out pretty cute in just a couple of minutes.
If you'd like to make your own, here are the steps.
1. Create a loop in your string.
2. Feed the long end of the string into the loop, making another loop.
3. Pull the first loop tight to create a slip knot.
4. Feed the long end of the string into the loop to make another loop but do not pull it tight this time. Repeat this step to your desired length.
Because of the loops you will have a little play in the bracelet that will allow you to slip it on even if you knot the ends like I did but you could attach some jewelry findings instead if you would prefer. To get the look of my bracelet I just did the steps above with 4 strings at once (with hemp cord) instead of a single string. I estimate you can have this finished in less than 10 minutes.
Sunday, November 20, 2011
New Office
The new office is painted! We got all of the stuff moved in and it looks so nice and clean. I just love it. We started with this room and here is where we have gotten to thus far.
For anyone wondering, the paint colors are Dark Granite on the walls and Billowy Down on the ceiling, both from Behr.
Boys' Room To Do list:
-Paint boys' room navy blue (they want to keep the color they have now) with white stripes
-Add shelves above beds in boys' room for treasures
-Add bedside lamps
-Hang new curtains in boys' room
-Move all the furniture/stuff between rooms
This is the boys' room at the moment, carpets freshly shampooed, and it will be the next large project we tackle here:
For anyone wondering, the paint colors are Dark Granite on the walls and Billowy Down on the ceiling, both from Behr.
Boys' Room To Do list:
-Paint boys' room navy blue (they want to keep the color they have now) with white stripes
-Add shelves above beds in boys' room for treasures
-Add bedside lamps
-Hang new curtains in boys' room
-
This is the boys' room at the moment, carpets freshly shampooed, and it will be the next large project we tackle here:
Thursday, November 17, 2011
Thanks, Facebook, for the Laugh
Well, the office is not quite ready to show you so, until it is, here is a slightly amusing story to tide you over.
As many of you use Facebook I'm sure you're aware that they are constantlybreaking everything tweaking their site. In this latest revision our posts and comments are visible to friends of friends even more than ever before and this can have some amusing consequences. Husband was recently commenting with a friend about a new video game they are both enjoying (as are several million others according to the record breaking sales numbers) and he got some fun hatemail in his Facebook inbox this morning. He decided to not respond and encourage the random internet person but I thought it would be more fun to yank his (her?) chain.
The Facebook message Husband recieved looked like this (some minor language):
you have a kids and your playing games? are you fucken kidding me? put the toys away little boy and take your kid to the park or spend some time with it. .i swear people are sick in the head these days . .
My kids are all well loved and played with and we make it a point to spend individual time with each of them. But this random person apparently decided that you can't enjoy a game and love your children at the same time and sent the missive above. Husband ignored it but I thought he should have responded with the following just for a laugh (please keep in mind that I am the last person to be the grammar police and I was only doing it to be a smart-ass in this case. I'm sure there are lots of grammar problems with many of my posts and I have no high horses about it):
Well, actually, I spend a lot of time with my kids and play computer games mostly after they are asleep in bed. In case you are thinking this means I ignore my wife, please be assured that she is playing right next to me and we do not lack for quality time together. However, before you decide to attack random people for random things on Facebook perhaps you should look to yourself. I can only imagine, since you are so passionate about the subject, that your parents spent a lot of time with you. It’s a shame they couldn’t teach you to write coherent sentences during that time. In lieu of your parents teaching you basic common sense and grammar, please allow me to help you out.
Sentences start with capital letters. It’s “You”, not “you”. Next, if you are using the word “kids” instead of “kid” then you can omit the “a” as it is unnecessary and doesn’t make much sense. Simply say “You have kids and…”. Also, “your” is possessive meaning something belongs to me. The correct usage you were looking for is “you are” or “you’re”, not “your”. Again, capital letters are most helpful in denoting the beginning of a sentence and you may want to consider using them as in “Are” instead of “are”. I assume you are aware, as of course your intelligent discourse suggests, that the word would be “fucking”, not “fucken” unless you actually meant, perhaps, a strange cross breed of a frog, duck, and chicken, in which case I can see how that makes sense in the same way that the new holiday dinner bird is called a turducken (turkey, duck, and chicken). However, since that would also not make any sense in that sentence I can only assume that your sentence enhancer was misspelled. Technically, a computer game is not considered a toy and is an entirely different sales market and you may simply want to say “game” (and you forgot another capital letter). I can assure you that I am not that little and am, in fact, over 6 feet tall so you may want to come up with a more thoughtful and intelligent insult. Also, you forgot to use commas, which is the correct way to address someone in a sentence (“Put the games away, little boy, and…”). My kids love the park and I believe it would be accurate to assume that I have been there more recently than you as no one with your particularly cranky demeanor could possibly have seen the sun in some time (are you related to Golem, by chance?). Really, the word “or” doesn’t seem correct in the next sentence, as you are suggesting that I do both, in which case you should say “and”, especially since going to the park IS spending time so it can’t be an “or” as I would, by the very definition, be doing both at once which would also make it an “and”. After you remove the gratuitous period in the next sentence, capitalize the “I” and then add a comma after swear (“I swear, people…”) and you’ll be just about done. In order to save you time I have corrected your oversights (notice the correct usage of the word “your” in this sentence for reference) for you and you may use the sentence below.
You have kids and you’re playing games!? Are you fucking kidding me? Put the games away, Random Name Call, and take your kids to the park again and spend some more time with them when they are supposed to be sleeping. I swear, people are as sick in the head as me these days.
No thanks necessary,
Your new Facebook friend
As many of you use Facebook I'm sure you're aware that they are constantly
The Facebook message Husband recieved looked like this (some minor language):
you have a kids and your playing games? are you fucken kidding me? put the toys away little boy and take your kid to the park or spend some time with it. .i swear people are sick in the head these days . .
My kids are all well loved and played with and we make it a point to spend individual time with each of them. But this random person apparently decided that you can't enjoy a game and love your children at the same time and sent the missive above. Husband ignored it but I thought he should have responded with the following just for a laugh (please keep in mind that I am the last person to be the grammar police and I was only doing it to be a smart-ass in this case. I'm sure there are lots of grammar problems with many of my posts and I have no high horses about it):
Well, actually, I spend a lot of time with my kids and play computer games mostly after they are asleep in bed. In case you are thinking this means I ignore my wife, please be assured that she is playing right next to me and we do not lack for quality time together. However, before you decide to attack random people for random things on Facebook perhaps you should look to yourself. I can only imagine, since you are so passionate about the subject, that your parents spent a lot of time with you. It’s a shame they couldn’t teach you to write coherent sentences during that time. In lieu of your parents teaching you basic common sense and grammar, please allow me to help you out.
Sentences start with capital letters. It’s “You”, not “you”. Next, if you are using the word “kids” instead of “kid” then you can omit the “a” as it is unnecessary and doesn’t make much sense. Simply say “You have kids and…”. Also, “your” is possessive meaning something belongs to me. The correct usage you were looking for is “you are” or “you’re”, not “your”. Again, capital letters are most helpful in denoting the beginning of a sentence and you may want to consider using them as in “Are” instead of “are”. I assume you are aware, as of course your intelligent discourse suggests, that the word would be “fucking”, not “fucken” unless you actually meant, perhaps, a strange cross breed of a frog, duck, and chicken, in which case I can see how that makes sense in the same way that the new holiday dinner bird is called a turducken (turkey, duck, and chicken). However, since that would also not make any sense in that sentence I can only assume that your sentence enhancer was misspelled. Technically, a computer game is not considered a toy and is an entirely different sales market and you may simply want to say “game” (and you forgot another capital letter). I can assure you that I am not that little and am, in fact, over 6 feet tall so you may want to come up with a more thoughtful and intelligent insult. Also, you forgot to use commas, which is the correct way to address someone in a sentence (“Put the games away, little boy, and…”). My kids love the park and I believe it would be accurate to assume that I have been there more recently than you as no one with your particularly cranky demeanor could possibly have seen the sun in some time (are you related to Golem, by chance?). Really, the word “or” doesn’t seem correct in the next sentence, as you are suggesting that I do both, in which case you should say “and”, especially since going to the park IS spending time so it can’t be an “or” as I would, by the very definition, be doing both at once which would also make it an “and”. After you remove the gratuitous period in the next sentence, capitalize the “I” and then add a comma after swear (“I swear, people…”) and you’ll be just about done. In order to save you time I have corrected your oversights (notice the correct usage of the word “your” in this sentence for reference) for you and you may use the sentence below.
You have kids and you’re playing games!? Are you fucking kidding me? Put the games away, Random Name Call, and take your kids to the park again and spend some more time with them when they are supposed to be sleeping. I swear, people are as sick in the head as me these days.
No thanks necessary,
Your new Facebook friend
Thursday, November 10, 2011
My Tree Pendant
As I was digging around in my bead box last night, looking for my friend's stone (for the cabochon posted here), I found several projects I had started but never finished. I started this pendant a year ago (based on the work of this artist) and last night I finished up the wire twisting. There are several more half finished projects in the box I'm looking forward to finishing up so I'm sure you'll see a few more on here soon.
I'm not posting a tutorial on this one since the idea was not created by me and the artist sells her creations (her etsy is here if you want to check it out).
Wednesday, November 9, 2011
Polished Stone Pendant
A friend of mine who knows I sometimes make jewelry asked if I could take a look at a small stone she has and see if I could make a pendant for her. Last night as I browsed Pinterest I found this pin (originally from here) for a cabochon tutorial. The tutorial is for a round stone but I figured I could adapt it somewhat for this purpose and here is what I came up with:
Tuesday, November 8, 2011
Monday, November 7, 2011
Fantasies in Chocolate Gala
I do not have a project to post today as we went out on the town instead of creating this weekend. I went to the Fantasies in Chocolate gala with Husband and several of our neighbors. It was my first time there and it's definitely going to be repeated. Great friends, dinner, wine, chocolate everywhere, and dancing. It was really lovely. My friend Zoe took the above picture and, since I didn't take my camera with me, I'll have to ask a couple other friends if I can share a few other shots with you because the place really looked amazing! I hope you had a great weekend too and I'll tomorrow I'll post the winner for Saturday's giveaway!
Thursday, November 3, 2011
Dollhouse: Stairs
The rest of the dollhouse story can be found at
Part I - The original derelict
Part II - Fixing her up
Part III - Repaired and pretty
A couple months ago I showed you the dollhouse I had when I was little that I fixed up for my kids.
Now I thought I might show you how my dad built those original stairs that stood up to all those years of abuse. The stairs are built from a single board, just one piece of 2x4. You can use a radial arm saw or a circular saw (you may want to make a jig for the second option). The blade is tilted at a 45 degree angle and the cuts are made 1/2" apart. Cut all of the angles one direction, turn the board around and cut them the other way. Now it looks like teeth.
Now it's just a matter of tipping it up to nail it in place and you have sturdy stairs that will stand the test of years and kiddos.
Wednesday, November 2, 2011
Pinterest Fall Challenge
It's time for the seasonal Pinterest challenge (hosted by YHL, Bower Power, Ana White and Erin from House of Earnest) where you make something you pinned on Pinterest. It's a great encouragement to actually get that project going that you were so inspired by. Lemon Tree Creations is also hosting a Pinsperation party and you can check that out here.
I saw this on Pinterest (originally from here) and created my Grow headboard (my original post with more pictures here).
Original Inspiration:
My creation:
And I saw this on Pinterest (originally from here) and created my own colorful version (my original post with more pictures here).
Original Inspiration:
My creation:
Have you made something after getting inspiration from a Pinterest pin? Play along over at Young House Love, Bower Power, Ana White’s, and House of Earnest. You can also join in over at Lemon Tree Creations.
Don't forget, Saturday is the last day to enter for the bracelet giveaway!
Tuesday, November 1, 2011
300 posts, a Tutorial, and a Giveaway
300 posts! My little blog is getting so big. As promised today I am doing a giveaway, the info is at the end of this post. (This giveaway is now closed but the tutorial is still good!)
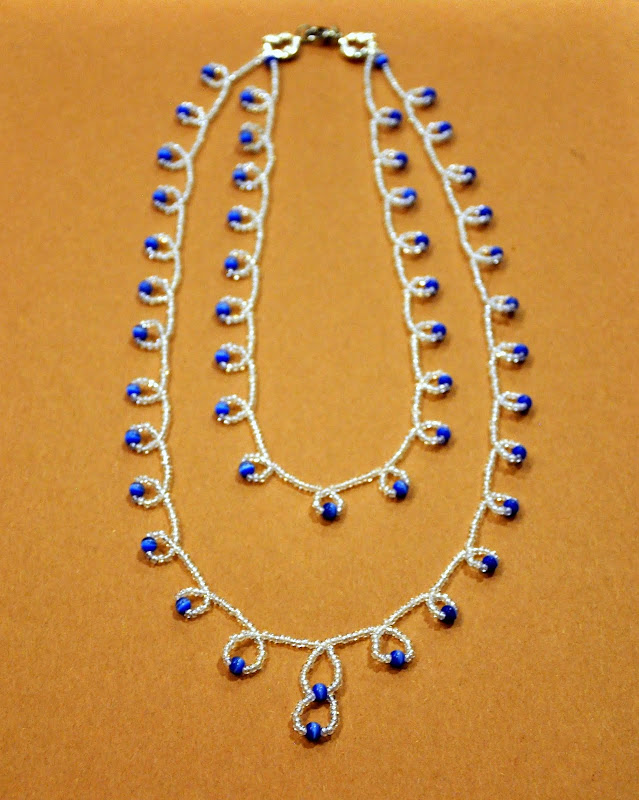
This is the necklace I showed you yesterday and today I'm going to show you how simple it is to make if you want to try it out.
You need beading wire, a small piece of tiger tail or a beading needle, seed beads, and 1-2 dozen larger beads that have a hole small enough the seed beads don't fit inside.
If you are using tiger tail you can fold it in half and crimp the end (as pictured) to make a threading needle that will hold your thread. String 16 seed beads, 1 large bead, and then 5 more seed beads.
Count back to the 11th bead of the 16 (leaving 5 after it before the large one) and run the thread through that bead a second time in the same direction as you did originally.
Pull the loose thread through and this is what you will have. Now repeat this until the bracelet/necklace is the desired length. Now just tie off your ends and secure to your fastener and your creation is done!
I now have a bracelet to match the necklace, made in about 40ish minutes.
(This giveaway is now closed)
And now for the fun GIVEAWAY details! In order to thank all of you wonderful followers for visiting me I am giving away the bracelet below, handmade by me, to one of you. If you are a follower of this blog (or become one), leave a comment below to enter for it. I'll pick a random winner on Saturday at 12:00. That's it! If you don't have an email in your profile you can leave it in the comments (but use "at" instead of "@" to keep junk mail from picking it up). Good luck!
Monday, October 31, 2011
Beaded Necklace and Announcement
Day 31/31:
First off, we have reached day 31/31. Whew! 31 days of projects is a lot and I'm beat but in a really good way! I got SO MUCH done around my house and off my project list and I'm extra happy about it. I will have to do this again. Anyway, not only is this a completion of 31 Days but tomorrow will also be my 300th post so I think that calls for my very first giveaway! Sound good? Come back tommorow for the details. Ok, on to your regularly scheduled post:
I have a black tie dinner coming up (so excited!) and I needed a little bling to go with my dress. Something pretty and also a little dainty. I made a necklace similar to this once and loved it while it lasted but I made the original with cheap sewing thread and one of the kids broke it with a single pull. This time I used beading thread and doubled the line to give it extra strength.
I used white beads with a bright blue to set it off a bit. The style is REALLY simple to make. It's something I came up with while screwing around a couple years back and it's a good project to keep your hands busy while helping with homework or watching TV. I'll post some detailed pics tomorrow (you can find the tutorial here!) of how it's strung with a couple extra little tips that help while making this. All total I think this took me about 2.5 hours to make.
Labels:
31 Days of a Handmade Home,
Crafts,
Jewelry
Subscribe to:
Posts (Atom)