
Inspired by Pinterest, I decided to try melting some crayons. According to Crayola the melting temp is somewhere around 135 Fahrenheit (give or take 10 degrees) but other sources have pointed out that different brands can vary slightly in melting times/temps.

The basic process I used is that I bought some foam core board ($2.40) and a box of 48 Crayola crayons ($2.37) and some "extra strong" Elmer's glue (new this year I guess and a little sturdier than regular Elmer's). For the large one I cut the foam board in half and then glued the crayons down along the top. The other half I later cut up into 3 pieces because the girls wanted to try it and we raided the crayon stash. One of theirs is also done with Crayola, 2 with an off brand.

I thought a hair dryer might not be hot enough so, not having a torch handy, I just went for the oven. On my counter I conveniently have 6 pots I have not planted yet and I figured they would probably be oven safe so I used them to prop up one end so the picture would be directional. Underneath at the bottom I also placed some tinfoil to catch drips (unless you hate the pan DO NOT skip this) and made sure it was curled a little so none would escape. I played with temperatures around 300 Fahrenheit (give or take 20 depending on which one I was doing). If you try this then when you take it out of the oven remember that, of course, it's all very hot and don't touch. The wax (even what is on the tinfoil) is still hot and in some cases still very liquid. So use extreme caution.

The not-Crayola brand definitely melted differently. It was less of a smooth melt and more solid blob like maybe the shells weren't as tight? In any case it was still good because it made each a little different from the next.

The crayons leave a darker mark around where they are from moisture/wax so next time I may have to try this on something like wood and see if I can lessen the appearance of that. Also, in all 4 cases, it was a very smooth melt and not as chunky/candlewax like as I would have hoped. So next time I may try for the torch. I think if I melt only at Crayon level (and not all over like the oven does) then I might be able to get a more drippy effect.

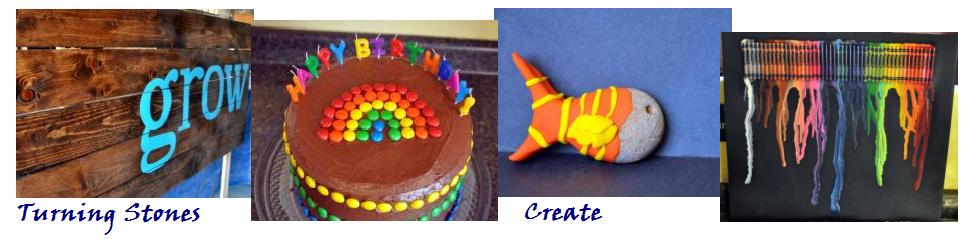
And here is what we ended up with this time around:

Have you been inspired by Pinterest to try a project? What are you working on?
Also playing at:


You always find the coolest projects! I hope I can find neat stuff like this to do when Roxy gets older :)
ReplyDeleteHey! I did this a couple of weeks ago and used a hard canvas (not a stretched one) and hot glue to hold down the crayons. I also did this with a hair dryer (totally works) and in the oven. Got two very different effects. Here is a link to my hair dryer one and the oven one is linked at the bottom of the post. http://naptimecraftmommy.blogspot.com/2011/07/melty-crayon-canvas-art.html We didn't get the waxy bleed on the sides. Also, a heat gun/ embossing gun is probably the best "tool" for this, but I'm cheap so I improvised! :) Hope you had as much fun as we did!
ReplyDeletethat looks way cool! definitely makes me want to try. as for pinterest, i've got some stitching projects brewing. it is totally addictive.
ReplyDeleteI've seen this on pinterest too. Soo cool!
ReplyDeleteI think yours turned out really well, especially that big one! I did this project for the Pinterest challenge, but I used canvas and a hairdryer - it turned out great! You can check it out here: http://unsimpleliving.wordpress.com/2011/08/02/melted-crayon-art/
ReplyDeleteThanks for sharing yours!